12
2010-Jul
How to Simulate Fractals in Photoshop작성자: Mond 조회 수: 14339
다음은 프랙탈을 만드는 제작툴을 사용하지 않고 포토샵 기능만을 이용하여 프랙탈 이미지를 만드는 튜토리얼입니다.
영어로 되어 있으나 포토샵 툴을 보시면 이해가 될것입니다.
저도 많은 도움이 되었습니다.
특히 동영상을 보시면 더욱 도움이 되실겁니다.^^
Have you ever seen those outstanding fractal images with a lot of swirls and colors? Some of those were build simulating fractals or repeating shapes, where each shape is a reduced part of the whole, others were build mathematically. In this tutorial, we’ll create a stylized fractal design using only Photoshop.
Final Image Preview
Let’s take a look at the image we’ll be creating. Want access to the full PSD files and downloadable copies of every tutorial, including this one? Join Psdtuts+ PLUS for just $9/month. You can view the final image preview below or view a larger version here.
Video Tutorial
Our video editor Gavin Steele has created this series of video tutorials to compliment this text + image tutorial.
Step 1
Wikipedia define fractals as "a rough or fragmented geometric shape that can be split into parts, each of which is (at least approximately) a reduced-size copy of the whole." There are many ways to create fractals, most involve complex mathematical formulas, or fractal software programs, like Apohpysis for example, but with our good old Photoshop we can simulate the fractals behavior using repeating shapes and some useful keyboard shortcuts.
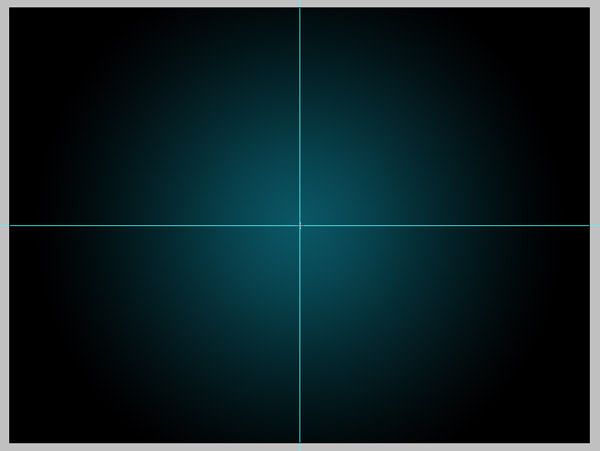
So, let’s get it started. First we’ll start with a 1600 pixels by 1200 pixels document, it’s huge because I’m planning to use it as a desktop background. Then, show the ruler (Command + R) and change the unit to Percent. Now, draw two guides, one horizontal and the other vertical, and place them in the middle of the document. Next, using the Gradient Fill Tool, draw a radial gradient (#095261 – #000000), which should look similar to the image below.
Step 2
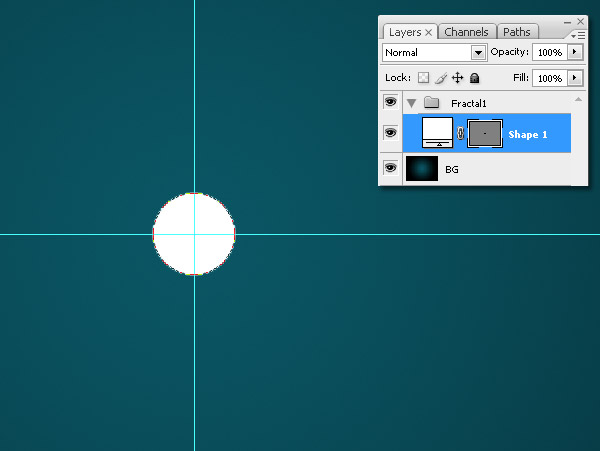
Now here’s the only shape you’ll draw: a circle, yes I’m not kidding, everything starts from a single circle. Draw it using the Ellipse Tool, hold the Shift key to create a perfect circle, and if you want hold the Alt key to draw it from the center. The circle size is 83 pixels by 83 pixels and it’s located in the middle of the document. Now, create a new folder named "Fractal" and place the circle shape inside of it.
Step 3
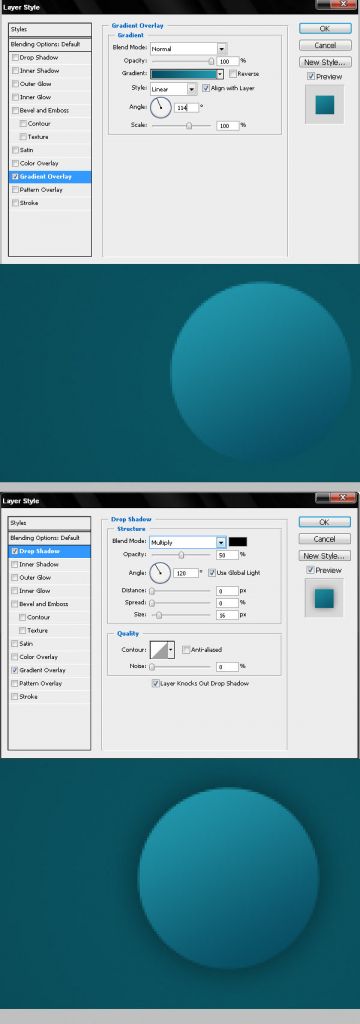
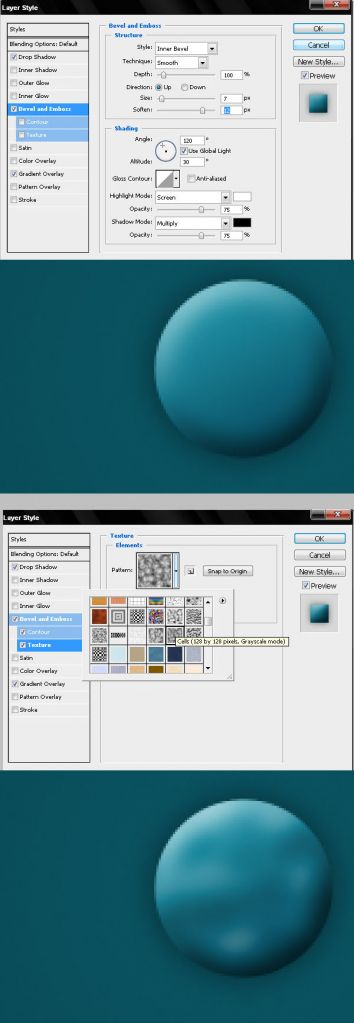
Let’s add some depth and volume to our shape. First, apply a Gradient Overlay that goes from dark blue to light blue, with a Drop Shadow, 50% Opacity, and a 0px distance, some Bevel and Emboss, including a texture. Just follow the images below.
Step 4
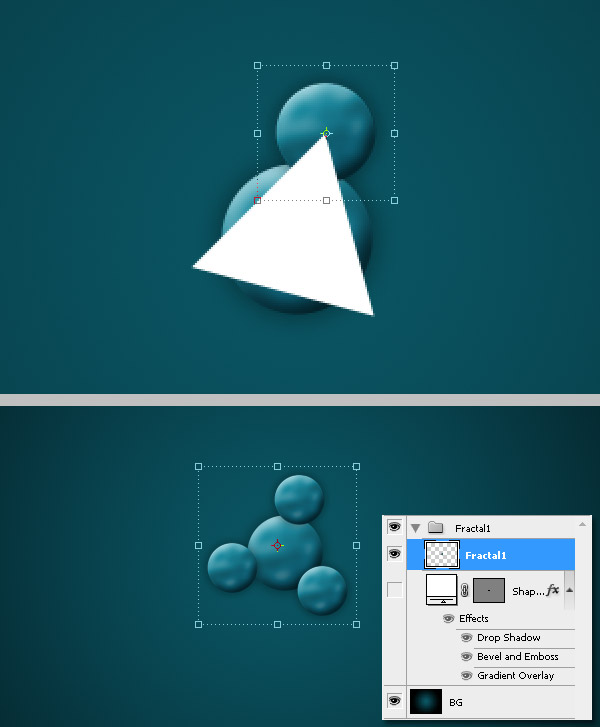
Now duplicate the circle layer by dragging the shape while pressing the Alt key, then merge the circle copy with a new blank layer to keep the style proportional. Resize the copy a little bit and place it 120 degrees from the middle of the document, you can use a triangle as a guide (I drew the triangle using the Polygon Tool).
Place the copy just over one of it’s corners. Repeat this twice to get three small circles around the big circle. Delete the triangle and finally merge the four circles into a new layer called "Fractal 1" (If you want leave a copy of the original vector shape just in case).
Step 5
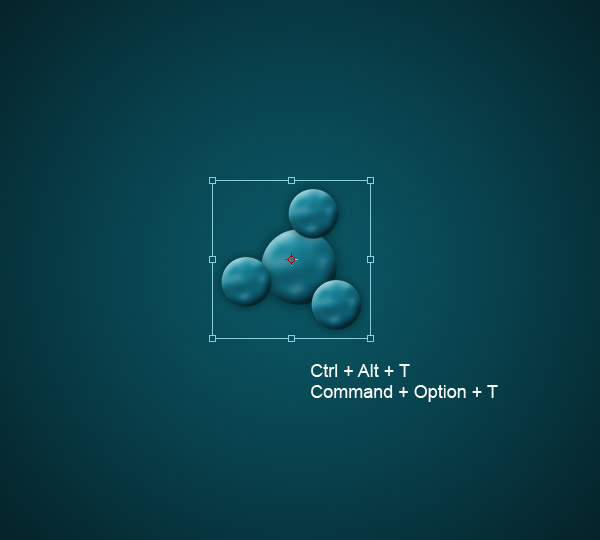
Here comes the fun part, we’re going to repeat two steps several times. This is the first one, we’ll Duplicate and then Free Transform. To get the right effect we need to use the shortcut Command + Alt + T. This command duplicates the existing image and allows to free transform the copy. Do not click anywhere and go to next step.
Step 6
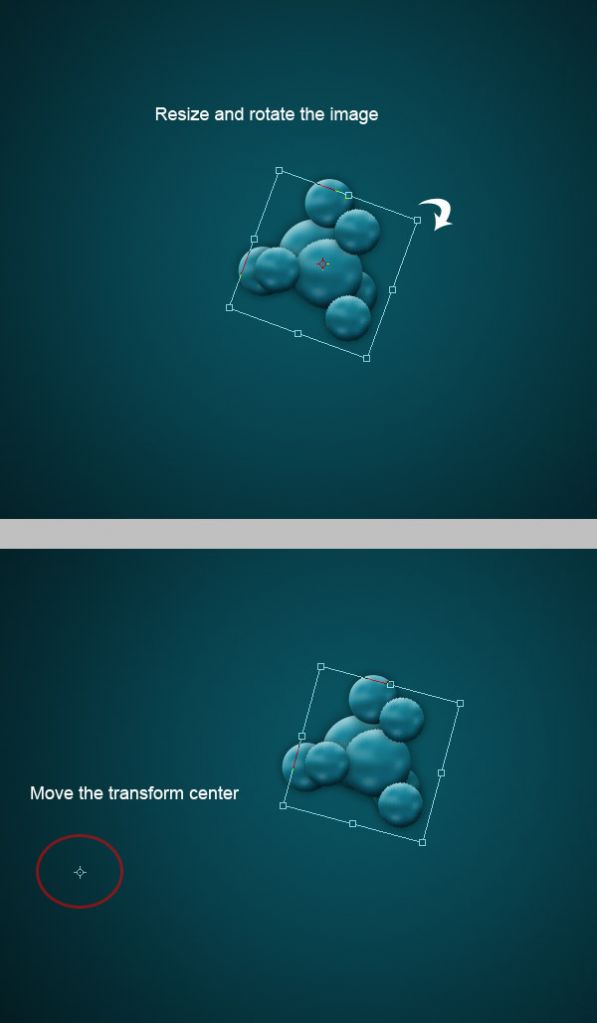
While holding the Shift key, resize the "Fractal 1 copy" just a little bit, then rotate the copy a few degrees Clockwise. The trick to simulate the fractals is move the Transform center to the left, right, top, or bottom, depending on your needs. This time we’ll move it a lot left. Finally, hit Enter.
Step 7
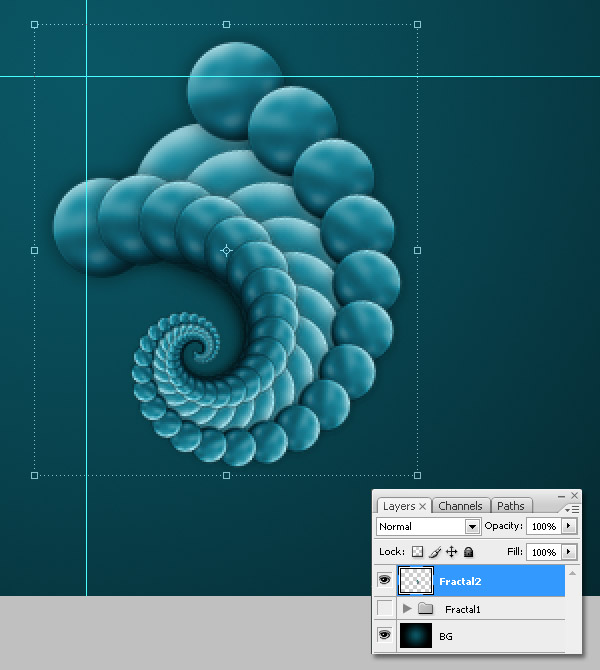
Now we’re going to use another useful keyboard shortcut. Press Command + Shift + Alt + T to apply Free Transform again once and see the result. What happened? Photoshop takes the previous values of the Free Transform and apply them to the new object. If you repeat this command several times you’ll get a nice fractal swirl. Photoshop creates a new layer each time you apply this command.
Step 8
Now, duplicate the entire "Fractal 1" folder, then select the "Fractal 1 copy" folder and hit Command E to merge the group. Now name the resulting layer "Fractal 2", then hide the original folder. Also, move the "Fractal 2" layer some pixels down and to the right from the middle of the document.
Step 9
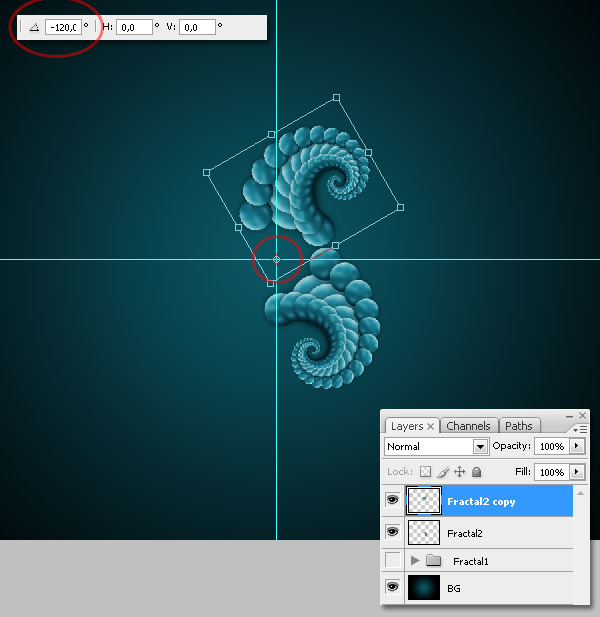
Select the "Fractal 2" layer, then apply the Duplicate and Free Transform keyboard shortcut from Step 5 (Command + Alt + T), though change the transformation center to the middle of the document and rotate the image -120 degrees CCW.
Step 10
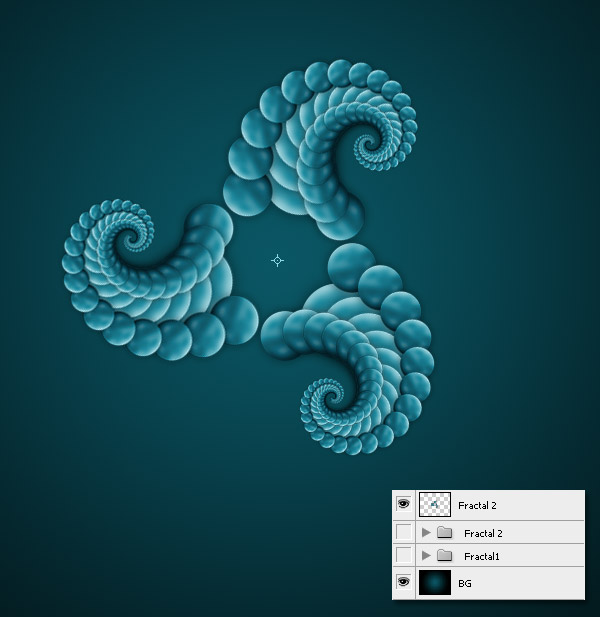
Now hit the Free Transform again keyboard shortcut from Step 7 (Command + Shift + Alt + T), doing this you’ll duplicate the 120 degrees rotate transformation exactly. Finally, put the three layers into a new folder named "Fractal 2," Now, duplicate the folder and merge the copy, hide the original folder, and name the merged copy "Fractal 2."
Step 11
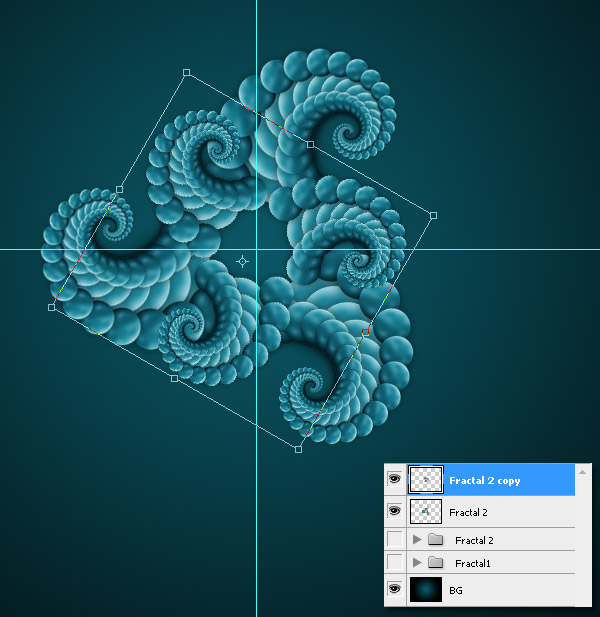
Duplicate and Free Transform (Command + Alt + T) the "Fractal 2" layer, keep the transformation center where it is, then while holding Shift + Alt keys, resize and rotate the copy just a little bit. Try to get something like the image below.
Step 12
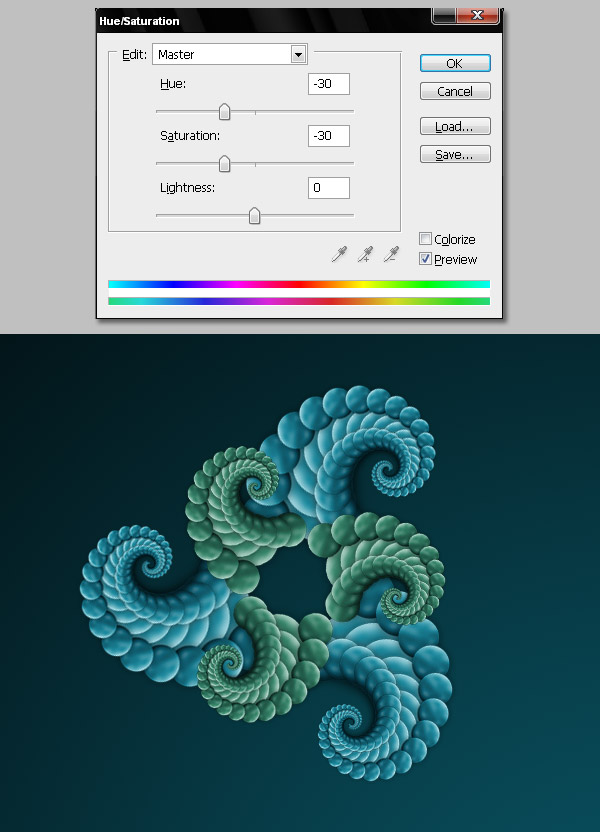
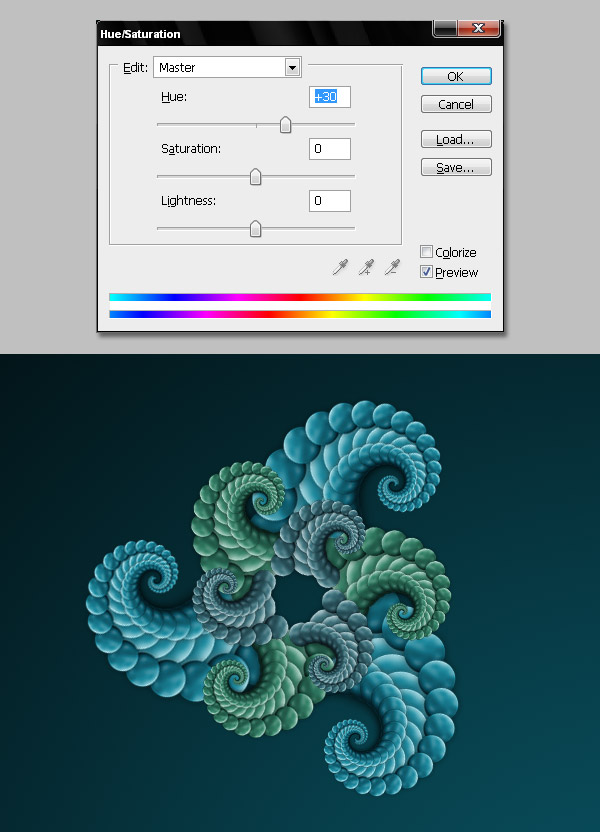
Change the "Fractal 2 copy" layer Hue/Saturation, use the values shown below. We’ll make this one a little bit green.
Step 13
Free Transform again the layer and adjust Hue / Saturation using these values.
Step 14
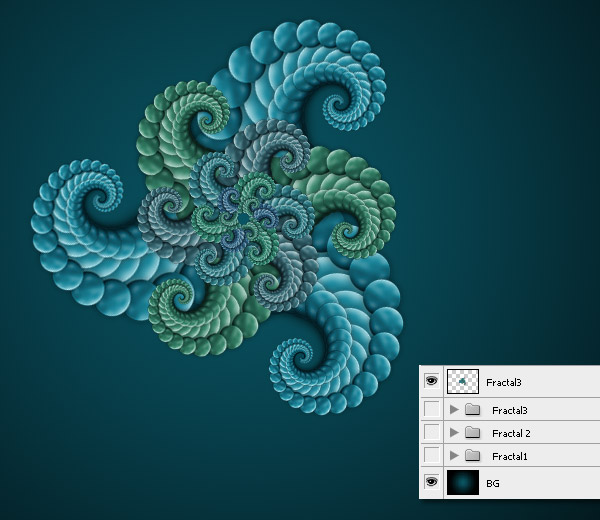
Repeat the Free Transform again command (Command + Shift + Alt + T) as many times as you want, but always change the Hue and Saturation to get one green layer above a blue one. When you have finished, group all the layers into a new folder called "Fractal 3." Next, duplicate the folder and merge the copy, just like in the previous steps. Name the copy "Fractal 3."
Step 15
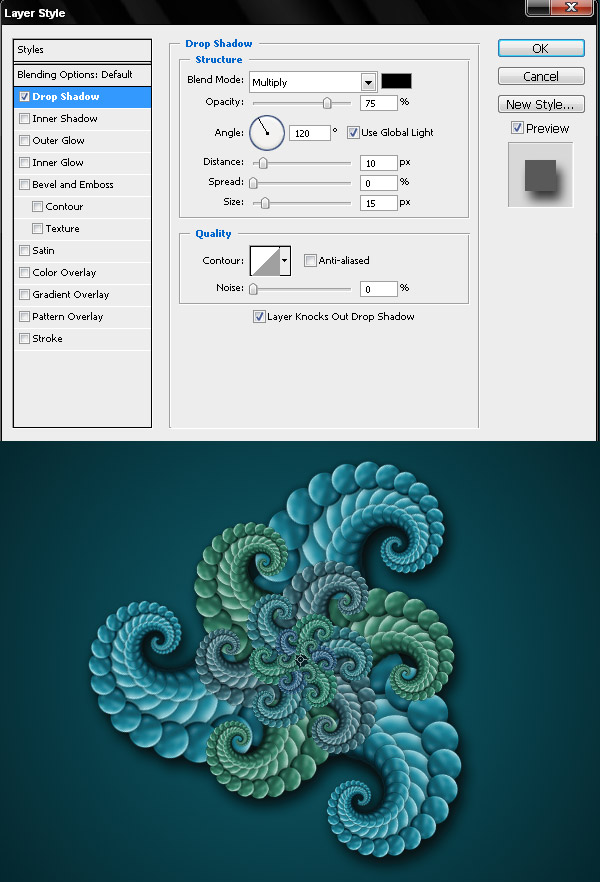
Add a dark Drop Shadow to the "Fractal 3" layer.
Step 16
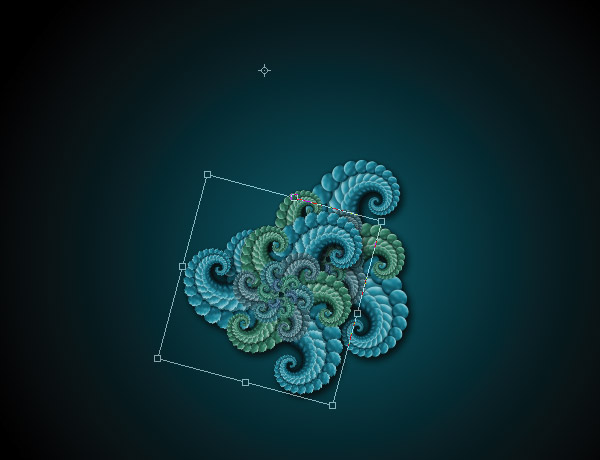
Duplicate and Free Transform (Command + Alt + T) the "Fractal 3" layer, rotate the copy a few degrees CW, resize it a little bit making the copy smaller, and change the transformation center to the top-left, then hit Enter.
Step 17
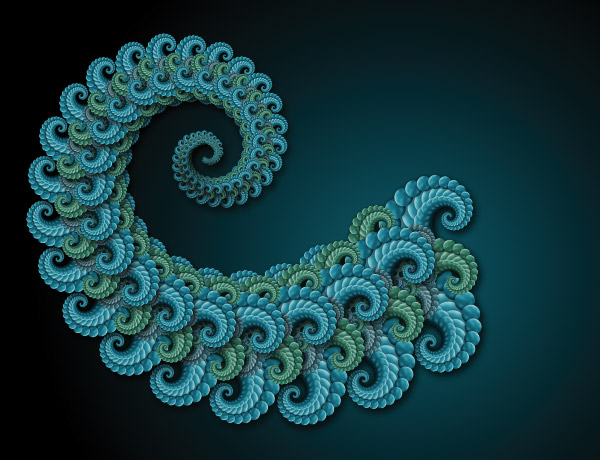
Free Transform again (Command + Shift + Alt + T) a lot of times to get something like this. You can repeat these steps as many times as you want, but I’ll stop the design right here.
Conclusion
As you can see, you can apply this technique to create a lot of abstract designs, or mixing the fractal shapes with real images to improve your outcome. It’s up to you from here. Good luck! You can view the final image below or view a larger version here.
Subscribe to the Psdtuts+ RSS Feed for the best Photoshop tuts and articles on the web.
Browsing AuthorAlvaro Guzman
출처 : http://psd.tutsplus.com/tutorials/tutorials-effects/how-to-simulate-fractals-in-photoshop/

 How to Simulate Fractals in Photoshop
Facebook 댓글